Cabbage Roasted Oven Recipe
This post contains affiliate links. As an Amazon Associate I earn from qualifying purchases.
I’m going to be honest with you—when life gets chaotic, the first thing to fall apart is dinner. You’re exhausted, the kids need homework help, and suddenly you’re staring into the fridge at 6 p.m. with zero plan. But what if you could make one simple recipe on Sunday and eat well all week? That’s the magic of meal prep done right. This oven roasted cabbage recipe is about to become your secret weapon. It’s wholesome, budget-friendly, and pairs beautifully with everything from baked cod fillets to roasted chicken. Make this once, and you’ll wonder how you ever lived without it.
Oven Roasted Cabbage Meal Prep: Cook Once, Eat All Week
I discovered the power of batch cooking cabbage during my first year as a registered dietitian. I was seeing clients who wanted to eat better but felt completely overwhelmed by meal planning. One Tuesday evening, I was meal prepping for myself—rushing between patients—and threw a few heads of cabbage in the oven while I organized my week ahead. When those wedges came out golden and tender, something clicked. I realized that one sheet pan could become the foundation for five completely different meals. My clients started doing the same thing, and suddenly their weekly nutrition goals felt achievable instead of impossible.
That’s what I want for you too. This recipe isn’t fancy or complicated. It’s real food for real life—the kind of cooking that gives you back your evenings and your peace of mind.
Why This Recipe Is Perfect for Meal Prep
- Saves you 20 minutes per weeknight – You’re not cooking on Monday, Wednesday, or Friday. That’s nearly an hour of your life back each week. No standing at the stove after a long day.
- Stays fresh and delicious for 5 days – Unlike many prepped vegetables that turn mushy, roasted cabbage holds its texture beautifully when stored properly. The caramelized edges stay crispy, and the inside stays fork-tender.
- Transforms into completely different meals – Serve it warm with fish on Monday, cold in a grain bowl on Wednesday, and tucked into tacos on Friday. One recipe, five distinct meals, zero boredom.
Your Weekly Meal Plan With This Recipe
Here’s exactly how I use one batch of roasted cabbage throughout my week. The beauty is that it feels like different meals because you’re pairing it differently each time. Your family won’t realize they’re eating the same vegetable—they’ll just know dinner tastes good and came together fast.
- Monday: Roasted Cabbage with Baked Cod and Lemon – Serve the warm wedges alongside perfectly flaked white fish. The acidity of lemon brightens everything. Takes 5 minutes to plate.
- Wednesday: Warm Cabbage and Grain Buddha Bowl – Toss your prepped cabbage with quinoa, chickpeas, tahini dressing, and pomegranate seeds. Completely different flavor profile, zero extra cooking time for the cabbage.
- Friday: Crispy Cabbage Tacos – Chop your leftover wedges, warm them briefly, and stuff into corn tortillas with avocado and fresh cilantro. Tastes like you spent hours cooking.
- Saturday: Cabbage and Chicken Fried Rice – Dice the remaining cabbage and stir it into a quick fried rice with day-old rice, eggs, and soy sauce. Comfort food in under 15 minutes.
The Ingredients – Scaled for a Full Week
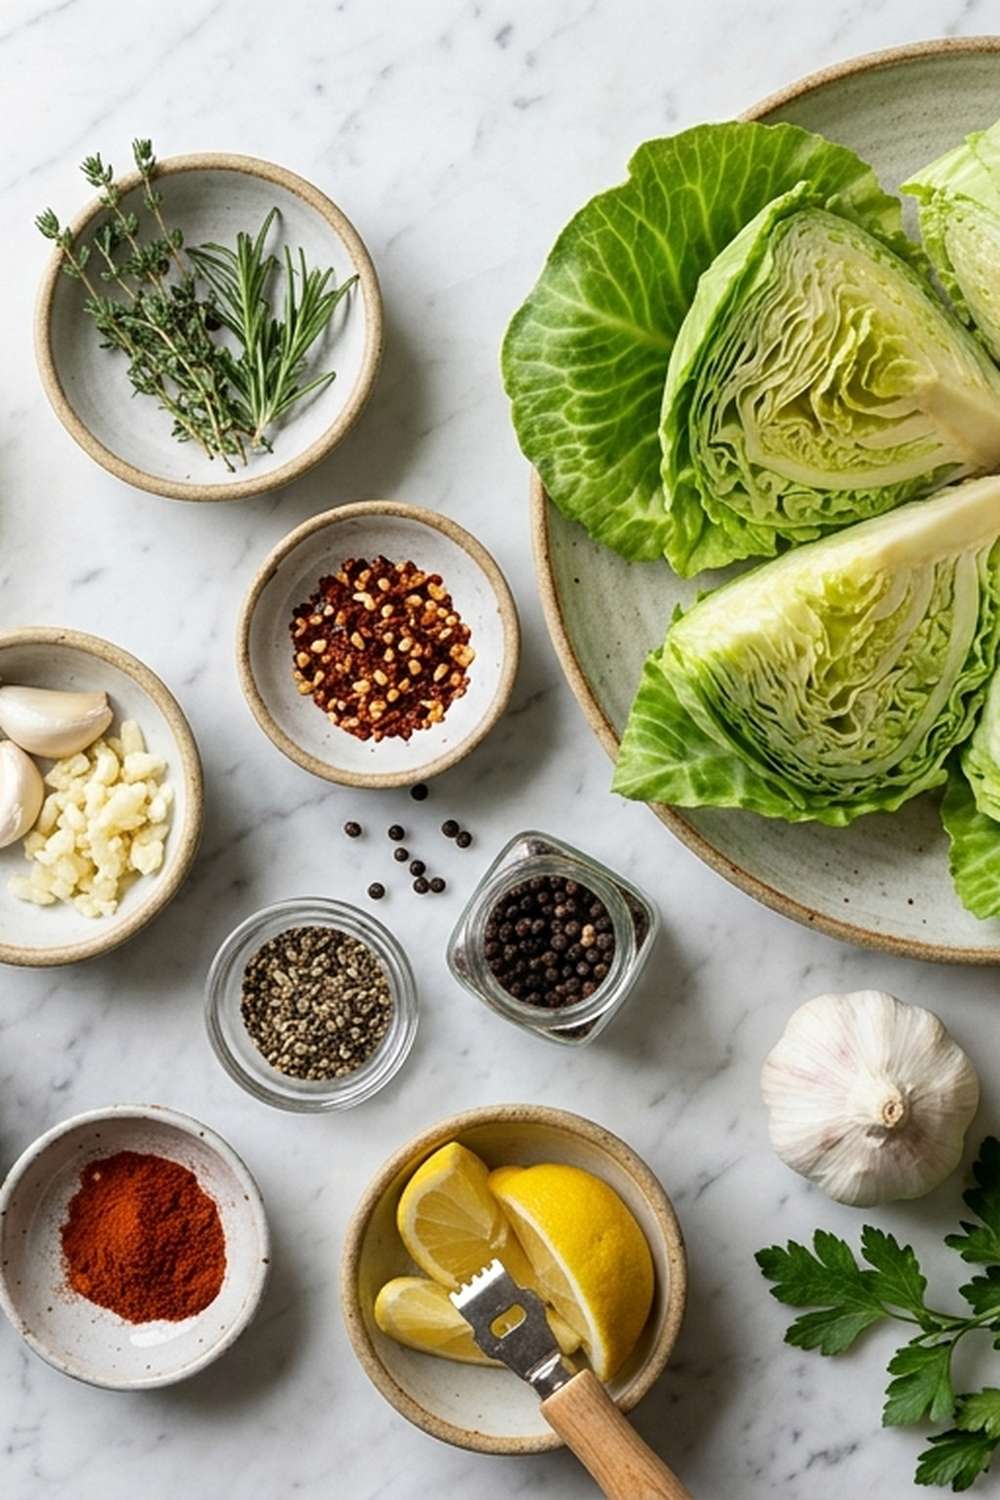
I’ve scaled this recipe to make enough for four generous servings with flexibility for mixing and matching throughout your week. These are all pantry staples you likely have on hand already. If you don’t, they’re among the cheapest items in the grocery store.
- 1½ teaspoons red pepper flakes (adjust based on your heat preference; adds warmth without overpowering)
- 3 teaspoons Diamond Crystal kosher salt (finer grains distribute more evenly than coarse salt, and kosher salt has a cleaner flavor than iodized)
- 1 teaspoon smoked paprika (adds subtle depth and a hint of smoky flavor that makes roasted cabbage taste restaurant-quality)
- ½ teaspoon black pepper (freshly cracked, not pre-ground; makes a noticeable difference in final flavor)
- 6 tablespoons olive oil spray or light olive oil in a spray bottle (prevents excessive oil while ensuring even coating across all wedges)
- 3 large heads green cabbage (about 6 pounds total before trimming; the tightly packed leaves store beautifully and provide multiple servings)
- 3 teaspoons garlic powder (freshly ground if possible; it stays potent for meal prep without losing intensity)
The Meal Prep Process: How to Make Oven Roasted Cabbage in Bulk
This is where efficiency meets simplicity. I’m going to walk you through the exact system I use when I’m prepping for my own family. The key is working in batches and using your oven space strategically. You’ll have everything ready to go in under 35 minutes from start to finish.
Step 1: Prep Your Station and Preheat Both Ovens
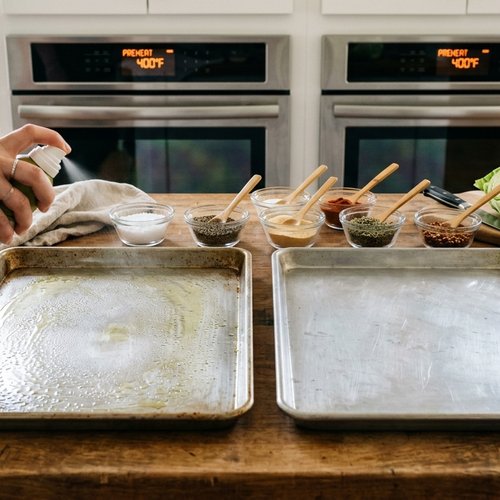
Set your oven to 400°F and let it fully preheat—this takes about 10 minutes. If you have two ovens, preheat both. Line two large rimmed baking sheets with aluminum foil (this saves cleanup time, and trust me, you’ll appreciate that on Sunday evening). Spray each sheet generously with olive oil, covering every corner. Have all your seasonings measured and in small bowls nearby. This is called mise en place in restaurant kitchens, and it changes everything about your speed and focus. You’re not hunting for the garlic powder when your hands are wet.
Step 2: Clean and Cut Your Cabbage Efficiently
Remove any damaged or yellowed outer leaves—compost them. Don’t throw away good leaves just because they look rustic. Rinse each head under cold water and set it on a cutting board. Cut each cabbage in half from top to root. Then cut each half into 4 or 5 wedges, keeping the core intact. This is non-negotiable—the core holds everything together during roasting. If you remove it, your wedges fall apart and become unpleasant texture-wise.
Cut all three heads first before moving to the next step. This assembly-line approach saves mental switching and keeps you moving.
Step 3: Dry Your Cabbage Completely
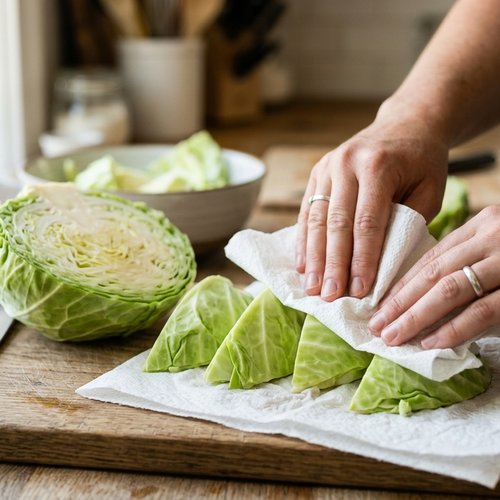
Pat each wedge dry with paper towels. This is the step most people skip, and it’s why their roasted vegetables steam instead of caramelize. You want a dry exterior so the heat can create those beautiful golden-brown edges. Take 5 minutes here. It matters more than you think.
Step 4: Arrange in Single Layers
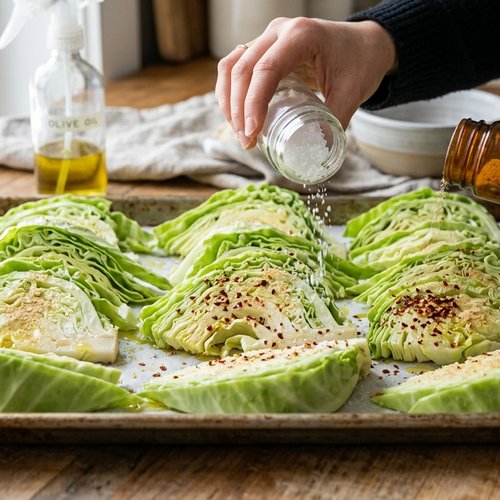
Place the dried wedges in a single layer on your prepared baking sheets. They should not overlap. If you’re doing three heads of cabbage and have two sheet pans, you might need to roast in two batches, which is fine. Better to give them space than to crowd the pan and end up with steamed cabbage.
Step 5: Season Generously
Spray each wedge lightly with olive oil on both sides. Use your spray bottle strategically—rotate the pan and spray at different angles to ensure coverage. Sprinkle the kosher salt, garlic powder, red pepper flakes, smoked paprika, and black pepper evenly across all wedges. Don’t be timid with seasoning. Vegetables need adequate salt to taste their best.
Step 6: Roast Until Golden and Fork-Tender
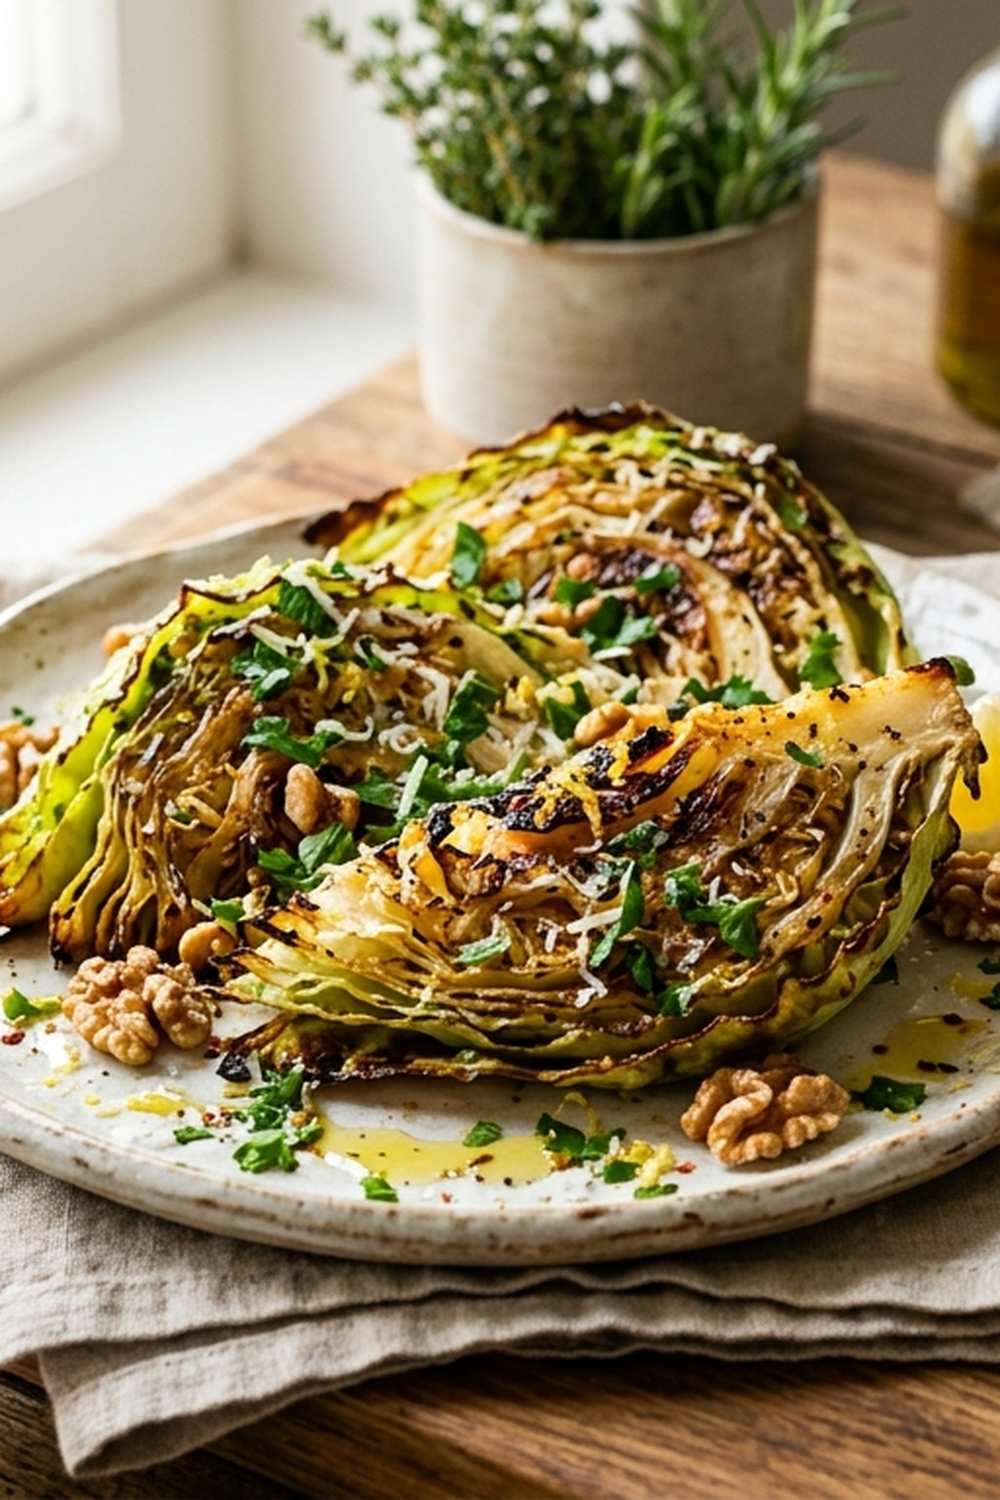
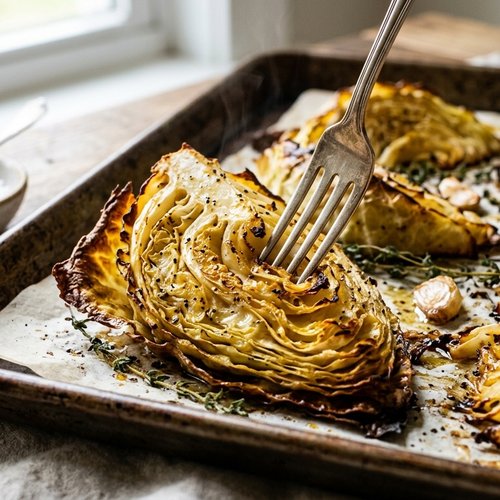
Place your sheet pans in the preheated oven. Set a timer for 25 minutes, then check. You’re looking for deep golden-brown caramelization on the edges and fork-tender flesh. Depending on your oven, this takes 25 to 30 minutes. If you’re using two sheet pans and only one oven, rotate them halfway through for even cooking. When they’re done, the outer leaves should be slightly crispy, and the inner flesh should yield easily to a fork.
Remove from the oven and let cool for about 5 minutes on the pan. This allows the exterior to set slightly, making them easier to handle without falling apart.
Storage and Organization System
- Glass Containers with Airtight Lids – Use 32-ounce or 48-ounce glass containers with lockable lids. Glass doesn’t retain odors, allows you to see what’s inside without opening, and lasts forever. Plastic containers absorb oils over time and become harder to clean.
- Portioning Strategy for Maximum Flexibility – Don’t divide into single portions. Instead, store in two or three larger containers so you can grab different amounts depending on what meal you’re building that day. Monday might call for a smaller portion if you’re serving with fish, but Wednesday’s grain bowl might need more.
- Labeling System – Use a permanent marker to write the date and “Roasted Cabbage” directly on the lid. It takes 10 seconds and saves you from playing the guessing game at 6 p.m. when you’re tired.
How to Reheat Without Losing Quality
The beauty of roasted cabbage is that it’s excellent both warm and at room temperature. Here are your best options depending on your mood and schedule.
Oven Method (Best for maintaining texture): Preheat your oven to 350°F. Spread your desired portion on a baking sheet and warm for 8 to 10 minutes until heated through. This gently brings back warmth without drying anything out.
Stovetop Method (Fastest): Heat a skillet over medium heat. Add a light drizzle of olive oil, then add your cabbage wedges. Warm for 5 to 7 minutes, stirring occasionally. This brings back a bit of that fresh-roasted flavor and keeps the edges slightly crispy.
Microwave Method (Honest option): Spread your portion on a microwave-safe plate, cover with a damp paper towel, and microwave for 2 to 3 minutes. It’s not fancy, but it works when you’re in a hurry. The damp paper towel prevents the edges from becoming too crispy.
Eat It Cold: Honestly? Roasted cabbage is delicious at room temperature or straight from the fridge. Toss it into a salad, chop it for grain bowls, or eat it alongside cold chicken. Don’t assume it needs reheating. Sometimes the best meal prep is the one that requires zero extra cooking.
Can I Freeze Oven Roasted Cabbage?
Yes, absolutely. Here’s my professional recommendation based on working with dozens of families on meal prep systems.
Freezing is best for portions you won’t eat within 4 days. Roasted cabbage stays fresh and delicious in the refrigerator for up to 5 days, so I typically only freeze if I’m preparing three or four weeks ahead. To freeze, let your roasted cabbage cool completely, then transfer to freezer-safe containers, removing as much air as possible. It will keep for up to 3 months in the freezer without quality loss.
Thaw in the refrigerator overnight before reheating. Don’t thaw at room temperature, as this creates an ideal environment for bacterial growth. Once thawed, use it within 24 hours. Reheat using the oven or stovetop method I mentioned above—avoid the microwave for frozen portions if you want to maintain the best texture.
Expert’s Nutritional Tip
Here’s something I share with every client: cabbage is one of the most nutrient-dense vegetables relative to its cost. It’s loaded with vitamin C, which supports immune function and collagen formation, plus it contains sulfur compounds that have been studied for anti-inflammatory properties. But here’s the thing most people don’t realize—roasting actually makes some of these nutrients more bioavailable. The heat breaks down cell walls, allowing your body to absorb certain compounds more efficiently. So you’re not losing nutrition by cooking it; in some ways, you’re enhancing it. This is why roasted cabbage as part of your meal prep isn’t just delicious; it’s genuinely nourishing your body all week long.
Nutrition Information
Per serving (approximately 200 grams of roasted cabbage): 90 calories, 3.5 grams fat, 14 grams carbohydrates, 2.8 grams fiber, 2.5 grams protein, and 380 milligrams potassium. This data aligns with USDA nutrition database standards. One serving provides approximately 35% of your daily vitamin C requirement and is an excellent source of vitamin K, essential for bone health and blood clotting. The beauty of meal-prepping roasted cabbage is that you’re building a nutritious foundation that supports your entire week. When your vegetables are already cooked and ready, you’re infinitely more likely to actually eat them, which means you’re hitting your daily vegetable targets consistently—something most Americans struggle with.
What to Pair With Oven Roasted Cabbage Throughout the Week
One recipe shines brightest when surrounded by thoughtful pairings. Here’s how I keep things interesting across my week without creating extra work for myself. Each pairing takes minimal effort but completely transforms the eating experience.
- Monday: Pair with Baked Cod and Fresh Lemon – The gentle flake of white fish and bright acidity of lemon juice create a restaurant-quality plate. Add a small side of brown rice and you’ve got a balanced, elegant dinner that came together in minutes.
- Tuesday: Pair with Rotisserie Chicken and Herb Yogurt Sauce – Buy a pre-cooked rotisserie chicken from your grocery store, shred it, and serve alongside your warm cabbage with a dollop of Greek yogurt mixed with fresh dill. Looks homemade, tastes incredible, took 10 minutes.
- Wednesday: Pair with Grains and Tahini Dressing – Use your prepped cabbage as the star of a grain bowl with quinoa, chickpeas, and a simple tahini dressing. Add pomegranate seeds if you have them, but honestly, just the tahini dressing is enough. This becomes your go-to lunch for the second half of the week.
- Thursday: Pair with Ground Turkey and Taco Shells – Brown some ground turkey with taco seasoning, warm your cabbage, and build soft or hard shell tacos. Top with avocado, salsa, and cilantro. Feels like you cooked, costs next to nothing, takes 15 minutes.
- Friday or Saturday: Pair with Eggs for a Breakfast-for-Dinner Moment – Chop your remaining cabbage and stir it into scrambled eggs with a bit of sharp cheddar. Serve with whole grain toast. Sometimes the best meal prep meals are the ones that blur the lines between breakfast and dinner.
Common Mistakes to Avoid
Mistake #1: Removing the Core – I mentioned this briefly, but it bears repeating because I see it constantly. Removing the core seems logical—it looks like the “waste.” But the core is the structural integrity of your wedge. Without it, you get a pile of loose leaves that fall apart during cooking and storage. Keep it in. It’s edible and delicious.
Mistake #2: Skipping the Drying Step – Wet cabbage steams instead of roasts. You won’t get those beautiful caramelized edges. Those edges aren’t just for looks; they’re where all the concentrated flavor lives. Spend five minutes patting everything dry. Your results will improve dramatically.
Mistake #3: Crowding the Pan – If your wedges are touching or overlapping, they can’t caramelize evenly. Yes, you might need two baking sheets. That’s fine. Better to wait 30 minutes for perfect cabbage than rush it and end up with mediocre results that sit in your fridge making you less excited about eating them.
Mistake #4: Underseasoning – Vegetables need salt. This isn’t a suggestion; it’s chemistry. Salt enhances flavor and brings out the natural sweetness of the cabbage as it caramelizes. Start with what the recipe calls for and taste as you go. You can always add more, but you can’t remove salt once it’s in.
Seasonal Variations
The beauty of this recipe is that it adapts beautifully across seasons. Fall and Winter: Add a pinch of ground cumin and coriander along with your garlic powder. Sprinkle toasted pumpkin seeds on top just before serving. The warmth of these spices feels cozy when the weather is cold.
Spring: Finish your roasted cabbage with fresh lemon juice and bright herbs like dill and tarragon. Add a sprinkle of fleur de sel for a more refined feel. It becomes lighter and more delicate.
Summer: Try red cabbage instead of green—it caramelizes beautifully and adds visual interest. Use white wine vinegar instead of lemon, and finish with fresh basil and a touch of balsamic reduction. Serve it cold alongside grilled fish.

Cabbage Roasted Oven Recipe
Ingredients
Method
- Set your oven to 400°F and let it fully preheat—this takes about 10 minutes. If you have two ovens, preheat both. Line two large rimmed baking sheets with aluminum foil (this saves cleanup time, and trust me, you'll appreciate that on Sunday evening). Spray each sheet generously with olive oil, covering every corner. Have all your seasonings measured and in small bowls nearby. This is called mise en place in restaurant kitchens, and it changes everything about your speed and focus. You're not hunting for the garlic powder when your hands are wet.
- Remove any damaged or yellowed outer leaves—compost them. Don't throw away good leaves just because they look rustic. Rinse each head under cold water and set it on a cutting board. Cut each cabbage in half from top to root. Then cut each half into 4 or 5 wedges, keeping the core intact. This is non-negotiable—the core holds everything together during roasting. If you remove it, your wedges fall apart and become unpleasant texture-wise. Cut all three heads first before moving to the next step. This assembly-line approach saves mental switching and keeps you moving.
- Pat each wedge dry with paper towels. This is the step most people skip, and it's why their roasted vegetables steam instead of caramelize. You want a dry exterior so the heat can create those beautiful golden-brown edges. Take 5 minutes here. It matters more than you think.
- Place the dried wedges in a single layer on your prepared baking sheets. They should not overlap. If you're doing three heads of cabbage and have two sheet pans, you might need to roast in two batches, which is fine. Better to give them space than to crowd the pan and end up with steamed cabbage.
- Spray each wedge lightly with olive oil on both sides. Use your spray bottle strategically—rotate the pan and spray at different angles to ensure coverage. Sprinkle the kosher salt, garlic powder, red pepper flakes, smoked paprika, and black pepper evenly across all wedges. Don't be timid with seasoning. Vegetables need adequate salt to taste their best.
- Place your sheet pans in the preheated oven. Set a timer for 25 minutes, then check. You're looking for deep golden-brown caramelization on the edges and fork-tender flesh. Depending on your oven, this takes 25 to 30 minutes. If you're using two sheet pans and only one oven, rotate them halfway through for even cooking. When they're done, the outer leaves should be slightly crispy, and the inner flesh should yield easily to a fork. Remove from the oven and let cool for about 5 minutes on the pan. This allows the exterior to set slightly, making them easier to handle without falling apart.
FAQs
How far in advance can I prep cabbage for roasting?
I recommend cutting and storing your prepped cabbage no more than 24 hours before roasting. Cut cabbage oxidizes over time, and you’ll lose some of that fresh crunch. If you’re planning to roast on Sunday, do your cutting on Saturday evening or Sunday morning. The roasted cabbage itself keeps beautifully for 5 days, so that’s your storage window.
Can I use red cabbage instead of green?
Absolutely. Red cabbage takes slightly longer to roast—usually 30 to 35 minutes instead of 25 to 30—because the leaves are denser. The flavor is slightly earthier and more complex. The caramelization looks slightly different because of the natural anthocyanin pigments, but it’s equally delicious. Try it next time you want to switch things up.
What if my cabbage wedges are different sizes?
They will roast at slightly different rates, which is actually fine. The thinner wedges might be done in 25 minutes while thicker ones need the full 30. I arrange my pan so the thicker wedges are toward the hotter part of the oven and thinner ones are toward the back. Remove them individually as they reach perfect doneness instead of waiting for everything to finish at once.
Is olive oil spray necessary, or can I use regular olive oil?
Spray is more convenient and ensures even distribution, but you can absolutely use regular olive oil. Use a pastry brush and brush each wedge lightly with oil. You’ll use slightly more oil this way, but the result is identical. If you go this route, about 3 tablespoons of regular olive oil replaces the 6 tablespoons of spray for this recipe.
Can I make this in a slow cooker or air fryer?
Slow cookers will turn your cabbage mushy and sad—skip it. Air fryers work beautifully and actually roast faster, usually in 20 to 22 minutes at 400°F. You’ll need to work in batches because of space constraints, but if you already own an air fryer, it’s a legitimate option. Arrange wedges in a single layer and spray lightly with oil before seasoning.
Make-Ahead Guide
Here’s my complete system for meal prepping roasted cabbage efficiently, based on years of helping busy families get organized:
Saturday Prep (30 minutes): Shop for your three heads of cabbage and any proteins you plan to pair with them throughout the week. When you get home, rinse the cabbage and store it whole in your vegetable drawer. This small step saves time Sunday because you’re not dealing with washing day-of.
Sunday Execution (35 minutes start to finish): Use my six-step process I outlined earlier. Preheat your oven, prep your station, cut all cabbage, dry it, arrange it, season it, and roast it. While it’s cooking (25 to 30 minutes), you can meal prep your proteins for the week or handle other cooking tasks. The cabbage becomes the foundation everything else builds on.
Sunday Finishing (10 minutes): Once the cabbage cools, portion it into your labeled containers. Store in the coldest part of your refrigerator, typically the back of a shelf on the bottom. This is your most reliable temperature zone.
More Meal Prep Recipes
- Baked Center Cut Pork Chop Recipe – Another sheet pan wonder that pairs perfectly with roasted cabbage for a complete protein-and-vegetable meal prep combo
- Baked Latke Recipe – For when you want crispy potato alongside your roasted vegetables; both store beautifully for several days
- Baked Cod With Lemon and Capers Recipe – The perfect protein pairing for your roasted cabbage wedges; prepare both on the same Sunday
You’ve got everything you need now. This isn’t complicated cooking; it’s smart cooking. It’s the kind of cooking that takes back your evenings, reduces your stress, and somehow makes your family’s meals better at the same time. That Sunday 35 minutes of effort becomes six or seven meals where you’re actually present with your family instead of standing at the stove stressed about what to cook.
I think about those family mealtimes from my childhood—the connection, the storytelling, the way good food brought us together. That’s still possible even when your week is chaos. It just takes a little strategy and one sheet pan full of golden, caramelized cabbage.
Take care with love and flavor!