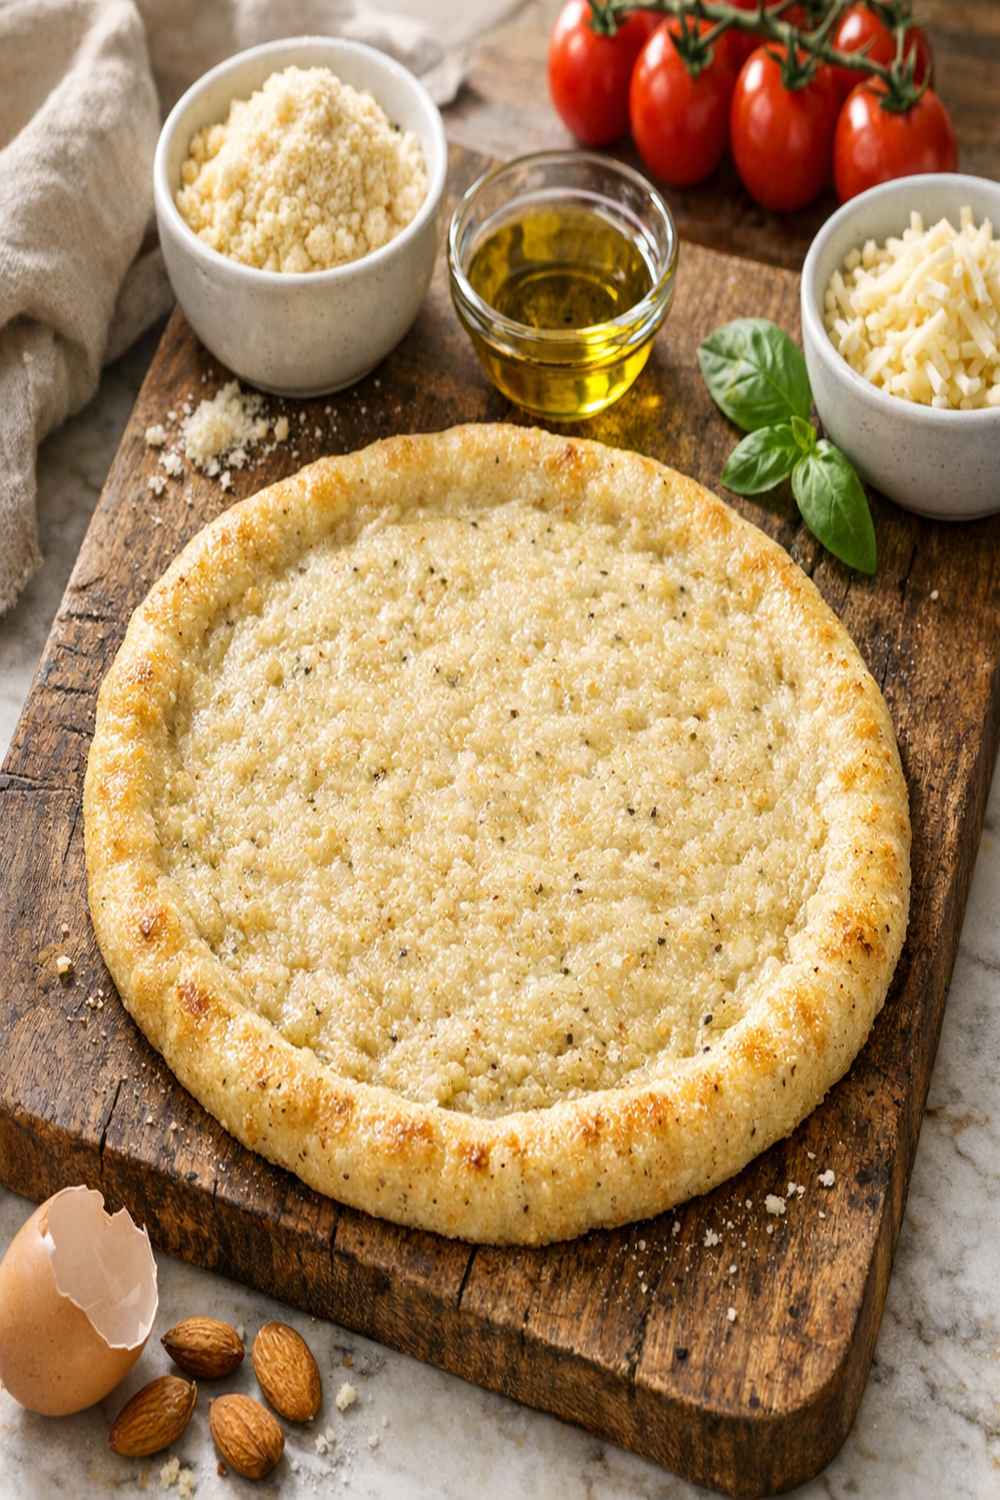
Almond Flour Pizza Dough Recipe
This post contains affiliate links. As an Amazon Associate I earn from qualifying purchases.
I grew up watching my mom stretch pizza dough on Friday nights while my siblings and I gathered around the kitchen island. There was something magical about that ritual—the way she’d toss the dough, the smell of yeast and olive oil filling our home, the stories she’d tell while we waited. But here’s what I didn’t know then: not everyone can enjoy that traditional pizza experience. When I started working as a registered dietitian, I realized how many people were left out of pizza night because of gluten sensitivity, carb concerns, or just wanting something more nutritious.
That’s when I discovered almond flour pizza dough, and honestly? It changed how I think about accessibility in the kitchen. This isn’t a “keto substitute” that tastes like regret. This is a genuinely delicious, nutrient-dense crust that holds up to toppings, satisfies that pizza craving, and comes together in about 30 minutes. If you’ve struggled with almond flour crusts that fall apart, taste gritty, or spread like pancake batter, I’m here to show you exactly why—and how to fix it.
Why Your Almond Flour Pizza Crusts Keep Falling Apart (And How to Finally Fix It)
Let me be honest: I’ve made plenty of pizza dough disasters. Crusts so fragile they crumbled the moment I tried to add sauce. Bottoms that stayed soggy no matter how long I baked them. Edges that burned while the center stayed pale and floppy.
After years of testing and helping clients navigate grain-free cooking, I realized the problem wasn’t almond flour itself—it was the technique. Most recipes treat almond flour like regular flour, but it behaves completely differently. Almond flour has no gluten structure to hold everything together. It doesn’t absorb liquid the same way. And it needs a completely different approach to prebaking and topping strategy.
This recipe works because it respects how almond flour actually behaves. We’re using eggs as our binding agent (not just filler), we’re prebaking the crust to lock in structure before adding toppings, and we’re being strategic about which toppings go on (spoiler: watery vegetables need pre-roasting). The result? A crust that’s genuinely crispy on the outside, sturdy enough to hold sauce and cheese, and ready in 30 minutes.
What Makes This Almond Flour Pizza Dough Recipe Different?
This recipe solves the three biggest problems I see with almond flour pizza: structural collapse, soggy centers, and bland flavor. Here’s how:
The egg-forward approach: I’m using beaten eggs as the primary binder here—not just a “wet ingredient.” Eggs provide protein structure that mimics what gluten would do in traditional dough. This creates a matrix that holds the almond flour particles together, so your crust doesn’t crumble when you pick it up.
The optional yeast addition: While yeast won’t create rise in this dough (almond flour lacks the starches needed for fermentation), it adds savory, bread-like depth that makes people say, “Wait, this is actually good.” It’s the difference between “acceptable grain-free” and “genuinely delicious.”
The prebaking step: This is non-negotiable. Baking the crust for 10-12 minutes before topping allows the eggs to fully set and creates a waterproof barrier. Without this, toppings release moisture that soaks into the crust. This single step is why this recipe works where others fail.
The parchment paper method: Pressing the dough between parchment prevents sticking without adding extra flour (which would dry out the crust). It also lets you keep the bottom parchment under the dough while baking, which prevents the bottom from browning too fast while the center catches up.
Before You Start: What You Need to Know
I want you to feel confident making this, so here are the two things that surprise most home cooks:
- Almond flour moisture varies by brand—this matters more than you think. Some brands are finer and slightly moister; others are coarser and drier. If your dough feels too wet and sticky after mixing (like batter rather than dough), you might have a moister almond flour. Add 2-3 tablespoons more almond flour, one tablespoon at a time, mixing between additions. If it feels crumbly and won’t hold together, your eggs might be slightly smaller than large, or your almond flour is very dry. Add 1 tablespoon olive oil and mix again.
- Watery vegetables will sabotage your crust—pre-roasting is the solution, not a suggestion. Mushrooms, fresh tomatoes, zucchini, and eggplant release significant water when heated. If you add them raw to this dough, that moisture seeps into the prebaked crust and makes the center soggy and collapse-prone. Roasting them for 8 minutes at 400°F first removes excess moisture and concentrates flavor. Dry toppings like pepperoni, cheese, and hardy vegetables (bell peppers, onions, broccoli) are safe to add directly.
The Ingredients
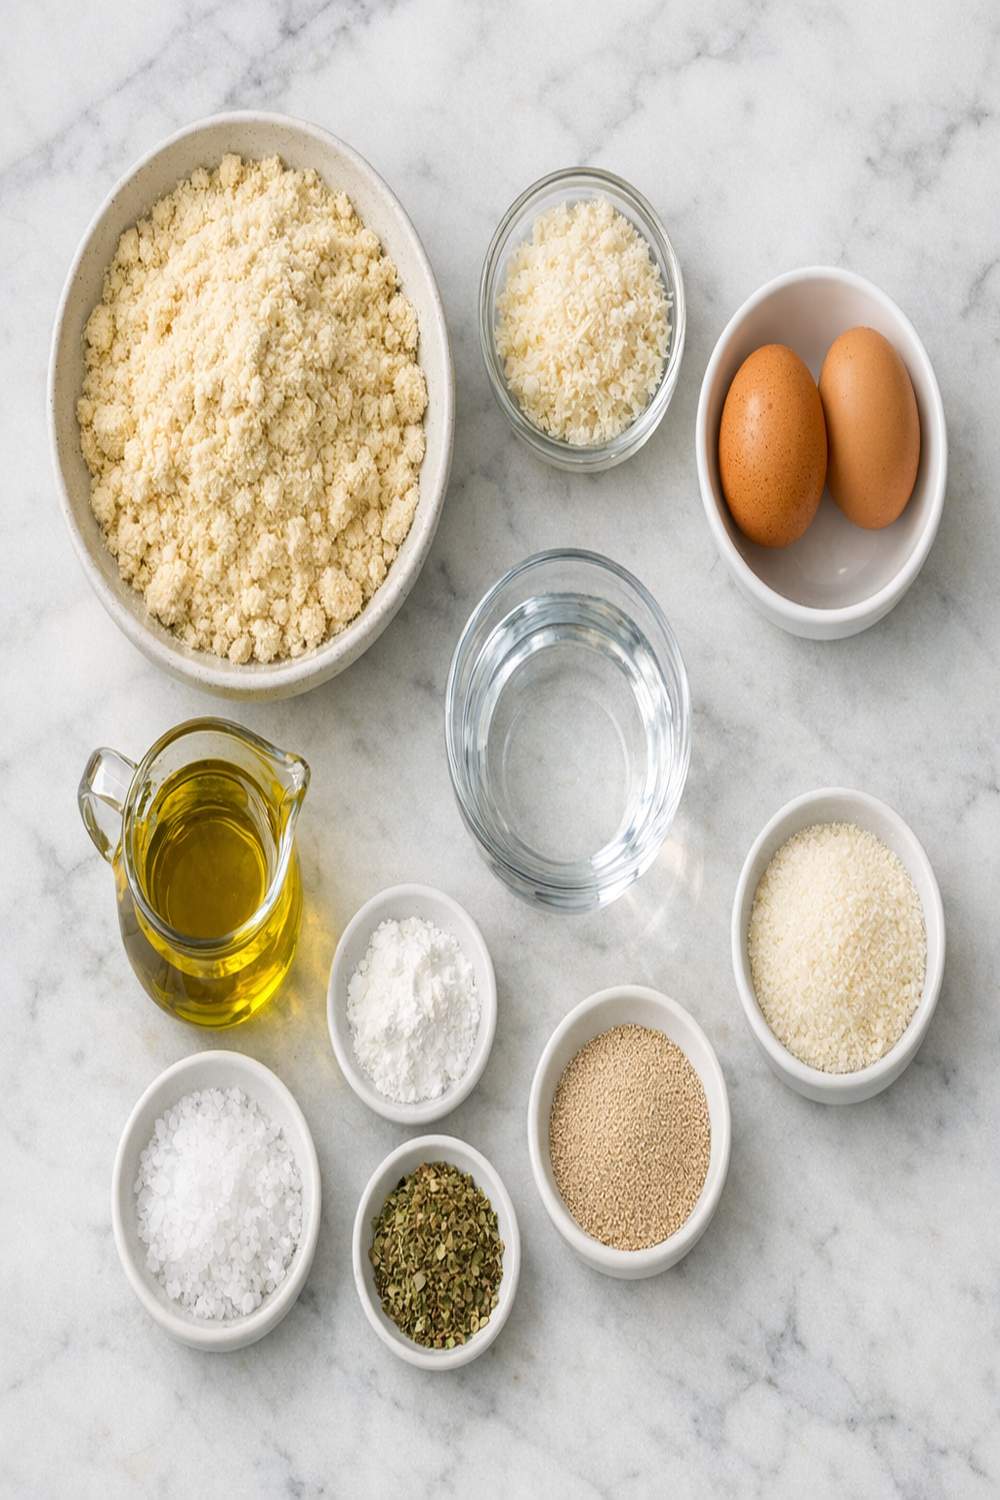
I’ve chosen each ingredient specifically for how it contributes to crust structure, flavor, and success rate. This isn’t a long list—you probably have most of these in your pantry right now. That’s intentional. I believe good food shouldn’t require a specialty shopping trip.
- ½ teaspoon baking soda (creates a slight rise and helps the crust brown evenly)
- 2½ cups almond flour (finely ground, not coarse; this creates a smoother texture than chunky varieties)
- ¼ teaspoon onion powder (builds complexity in the flavor profile)
- ½ teaspoon fine sea salt (enhances all flavors; don’t skip this)
- 1 tablespoon Italian seasoning (dried; brings Mediterranean character to the crust)
- ½ teaspoon garlic powder (adds savory depth without fresh garlic moisture)
- ½ tablespoon dry active yeast (optional but highly recommended; adds bread-like flavor without fermentation)
- 2 large eggs (beaten, at room temperature; cold eggs won’t bind as effectively)
- ¼ cup extra virgin olive oil (adds moisture, fat for texture, and rich flavor)
Makes one 12-inch pizza (8 slices) or one 10-inch thicker-crust pizza (8 slices).
Step-by-Step: How to Make Almond Flour Pizza Dough Without Fail
You’ve got about 30 minutes total—most of that is hands-off baking time. The actual active work is maybe 10 minutes. This is genuinely approachable, I promise.
Step 1: Preheat Your Oven and Gather Your Dry Ingredients
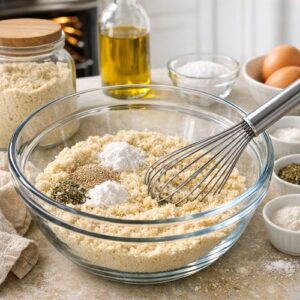
Start by preheating your oven to 400°F (200°C). While it heats, grab a large mixing bowl and combine your almond flour, baking soda, salt, garlic powder, onion powder, Italian seasoning, and optional yeast. Whisk these together for about 30 seconds to distribute the leavening agents and spices evenly. Uneven distribution means some spots of your crust will brown faster than others, and you might get small patches with concentrated garlic or salt flavor. We want consistency throughout.

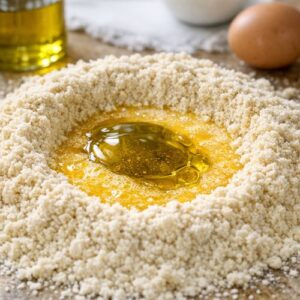
Step 2: Create a Well and Add Your Wet Ingredients
Make a well in the center of your dry mixture—think of it like a little crater. Crack your two large eggs into a small bowl and beat them with a fork until the whites and yolks are fully combined. Pour the beaten eggs into the well, then add your ¼ cup olive oil.
Don’t mix yet. Let the wet and dry ingredients sit for just 30 seconds. This gives the almond flour a moment to start absorbing the moisture, which will make mixing easier and help you avoid overmixing (which can make the texture tough).

Step 3: Mix the Dough Until Just Combined
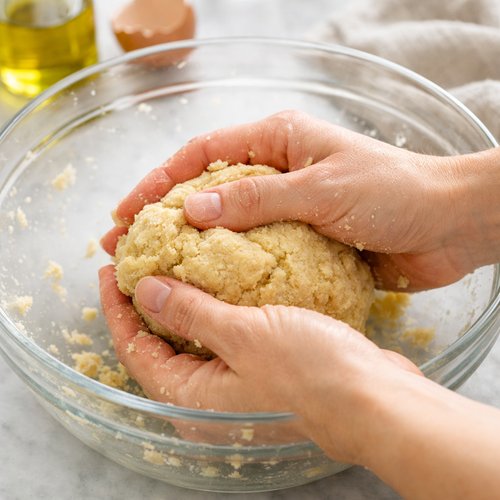
Using a sturdy spatula, begin folding the dry ingredients into the wet mixture. You’re looking for a consistency similar to cookie dough—moist, slightly sticky, but definitely holding its shape. The almond flour should be fully incorporated with no dry streaks remaining.
Once the spatula gets difficult to use (because the dough is getting thick), switch to your hands. Use your fingers to gently press and fold the dough together for about 20-30 seconds. You want a cohesive ball that feels slightly sticky but doesn’t stick aggressively to your fingers. If it’s too wet, add 1 tablespoon more almond flour. If it’s crumbly, add ½ tablespoon olive oil.
Step 4: Press and Roll Your Crust Between Parchment
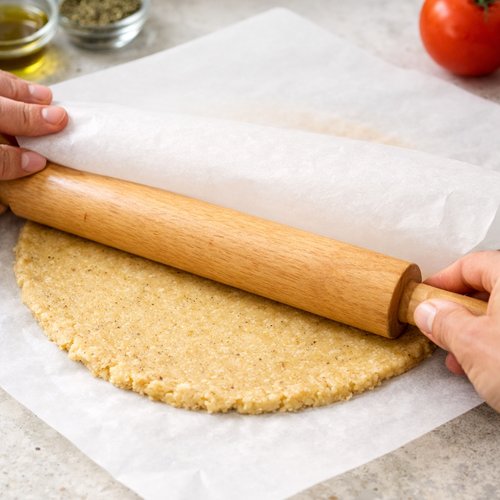
Tear off two pieces of parchment paper, each about 12 inches long. Place one piece on your work surface, then place your dough ball in the center. Top with the second piece of parchment, pressing gently so the parchment sticks to the dough slightly.
Using your hands, gently press the dough into a flat disc about ¼-inch thick. You’re not trying to get it perfectly thin yet—just creating a workable base. For a thin, crispy crust, use a rolling pin to flatten the dough to about ⅛-inch thickness in a 12-inch circle. For a thicker, chewier crust, leave it at about ¼-inch thickness in a 10-inch circle.
Work slowly and gently. If the dough resists rolling, let it rest for 1 minute under the parchment. This relaxes the almond flour structure and makes rolling easier without tearing.
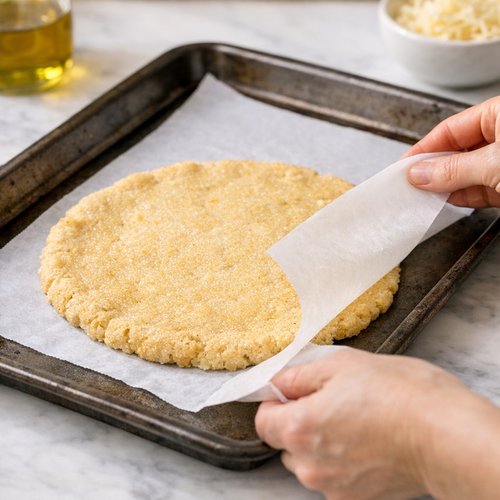
Step 5: Transfer to Your Baking Sheet
Carefully peel away the top piece of parchment paper. Smooth the edges of your crust—they should be relatively even and attractive. Keep the bottom parchment paper on the dough. Slide the bottom parchment (with the dough still on it) directly onto your preheated baking sheet. This keeps the crust from sticking and prevents the bottom from browning too quickly.
If your baking sheet is smaller than your dough circle, that’s okay—a small amount can hang slightly off the edge. Just be careful when moving it into the oven.
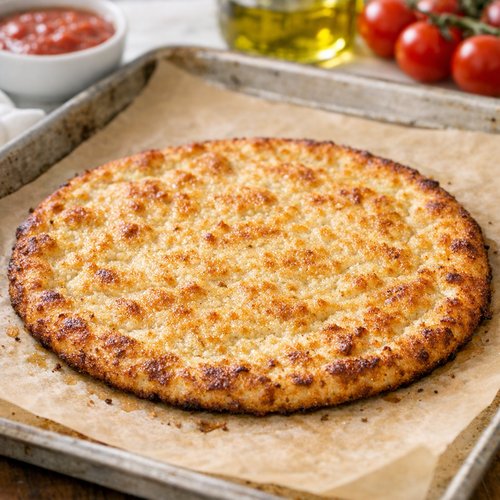
Step 6: Prebake Until Golden and Crispy
Place the baking sheet in the center rack of your oven. Bake for 10-12 minutes, depending on thickness. You’re looking for a golden-brown color on top and edges that feel firm and crispy when you gently tap them. The thicker your crust, the longer this takes—a ¼-inch crust might need the full 12 minutes, while a very thin ⅛-inch crust might be done at 10 minutes.
This prebaking step is absolutely critical. It sets the structure before toppings add moisture, creating a waterproof barrier that keeps your center from getting soggy.
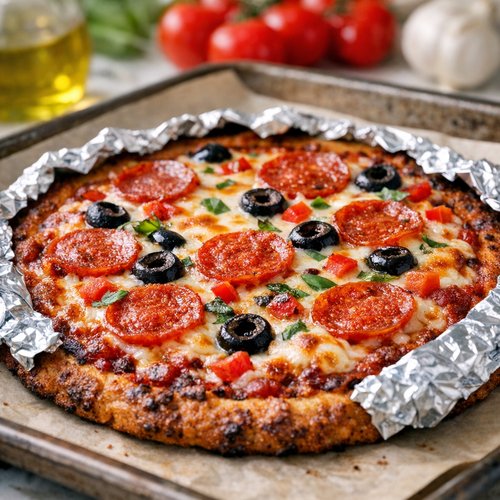
Step 7: Add Your Sauce and Toppings
Remove the crust from the oven and let it cool for 1-2 minutes. Spread a thin layer of pizza sauce or unsweetened tomato passata across the crust—you want enough flavor but not so much that it pools (which adds moisture). About 3-4 tablespoons is perfect for a 12-inch crust.
Remember: if you’re using watery vegetables like mushrooms, zucchini, or fresh tomatoes, pre-roast them first for 8 minutes at 400°F to remove excess moisture. Dry toppings like pepperoni, cheese, and hardy vegetables can go on directly. Distribute cheese evenly—it protects the crust from direct heat and seals in the structure.

Step 8: Final Bake Until Cheese Melts
Return the pizza to the center rack of your oven and bake for 5-8 minutes, until the cheese is melted and bubbly. Watch carefully—the edges can brown quickly, so don’t step away. If you want the cheese more browned or bubbly, you can briefly broil on the top rack for 2-3 minutes, but this will significantly darken the crust edges. To prevent this, loosely tent the edges with small pieces of foil while broiling.
The total time from putting the topped pizza in the oven should be around 5-8 minutes for cheese melting plus any broil time.
Step 9: Cool, Slice, and Serve
Remove the pizza from the oven and let it rest for 2-3 minutes on the baking sheet before slicing. This cooling time allows the cheese to set slightly and makes slicing cleaner. Use a sharp pizza wheel or chef’s knife to cut into 8 slices. Serve immediately while the crust is still crispy and warm.
The parchment paper should peel away easily at this point. If it sticks slightly, just gently lift from one corner and peel back slowly.

The Most Common Mistakes (And How to Avoid Them)
- Adding wet toppings directly to the prebaked crust. Raw mushrooms, fresh tomatoes, and zucchini release significant water when heated. This moisture seeps into your crust and turns it soggy. Solution: Pre-roast watery vegetables at 400°F for 8 minutes, allowing moisture to evaporate before they touch your crust. You’ll taste the difference immediately.
- Skipping the prebaking step entirely. I understand the temptation—you want to speed things up. But without prebaking, the crust doesn’t set before toppings add moisture. The result is a dough that spreads, collapses, and stays doughy in the center. Prebaking takes just 10-12 minutes but makes the entire recipe work. It’s not optional.
- Overmixing the dough after adding wet ingredients. Almond flour doesn’t have gluten, so overmixing doesn’t create toughness the way it would with wheat flour. But it does create a dense, gummy texture. Mix just until combined—you should still see slightly uneven color distribution. This takes about 45 seconds of hand-mixing, not 3 minutes.
- Using room-temperature ingredients inconsistently. Cold eggs won’t bind as effectively as room-temperature eggs. If your eggs came straight from the fridge, place them in warm water for 5 minutes before cracking them. This small step makes your dough bind more effectively.
- Spreading sauce too thick. Almond flour pizza crusts are sturdier than you might think, but they’re not invincible. Thick sauce adds weight and moisture. Use about 3-4 tablespoons for a full pizza, spread thin. You’ll taste the crust better, and moisture won’t accumulate.
How Do I Know When It’s Done?
Visual cues matter here because timing varies based on your oven and crust thickness. After the final bake, your crust should be golden brown (not pale, not dark), and the cheese should be melted and bubbly. If the cheese still looks white and solid, give it another minute.
The edges should feel crispy when you gently tap them with your finger—not soft or bendable. The bottom, if you peek under with a spatula, should be light golden brown, not pale. If the bottom is still pale after 8 minutes, your oven might run cool. Return it to the oven for 1-2 more minutes.
The center of the crust, when you gently press it, should feel set and firm, not squishy or doughy. It won’t feel exactly like traditional pizza crust—almond flour creates a slightly different texture, more like a cross between flatbread and cauliflower pizza—but it should be clearly cooked through and structurally sound.
Troubleshooting: When Things Go Wrong
- Crust falls apart when you try to pick it up. This usually means the eggs didn’t bind properly (possible causes: cold eggs, or overmixing created dense texture that’s cracking). On your next attempt, use room-temperature eggs and mix just until combined. If it happens mid-cook, the crust was too thin. Thicker crusts (¼-inch) are more forgiving than very thin ones.
- Center stays doughy even after 12 minutes of baking. Your oven is probably running cool, or you rolled the crust too thick. Place an oven thermometer inside and verify the actual temperature. If it’s below 400°F, increase the temperature by 25°F and try again. If the crust was very thick (½-inch), thin it out next time or allow extra baking time (up to 15 minutes).
- Bottom is dark brown but the cheese isn’t melted yet. Your oven’s heat distribution is uneven, likely with stronger bottom heat. Move the pizza to a higher rack (closer to the broiler element) and reduce bake time. Alternatively, preheat a baking stone on your highest rack, slide the pizza onto it, and bake. This distributes heat more evenly.
- Crust tastes gritty or has a sandy texture. This usually means your almond flour was coarser than ideal, or you’re using natural almond flour (which has visible almond particles). Switch to finely-ground blanched almond flour—the particle size is much smaller. Natural almond flour makes decent crust but with grainier texture.
- Edges burn before the center cooks. Protect the edges with a ring of foil during the final bake. Create a ring shape with foil and drape it around the outer 2 inches of the pizza. This shields the edges from direct heat while the center finishes cooking. Remove foil for the last 1-2 minutes if you want the edges slightly darker.
Can I Store Almond Flour Pizza Dough Recipe?
Yes, and this is one of my favorite features of this recipe. Since it bakes fully, you’re storing cooked crust, which is incredibly forgiving.
Refrigerator storage: Store leftover baked pizza slices in an airtight container for up to 4 days. To reheat, place on a baking sheet and warm at 350°F for 5-7 minutes. This restores crispness without drying out the crust.
Freezer storage (my preferred method): Cool the pizza completely, then wrap individual slices in plastic wrap and place them in a silicone bag or airtight container. They keep beautifully for up to 3 months. To reheat frozen pizza, defrost for 2 hours on the counter, then place on a baking sheet and warm at 320°F for 5-8 minutes. The slower reheat temperature prevents the outside from drying while the inside catches up.
Pro tip for freezing: Flash-freeze the slices uncovered on a baking sheet for 2 hours before wrapping. This prevents them from sticking together and lets you pull out just one or two slices without thawing the whole batch.
Can you freeze unbaked dough? Technically yes, but almond flour dough doesn’t freeze as well as wheat-based dough. The texture becomes slightly grainier and drier after freezing. I recommend baking fully, then freezing the cooked pizza instead.
Expert’s Nutritional Insight: Why Almond Flour Changes Everything
As a registered dietitian, I love this recipe because it solves nutritional problems that traditional pizza creates, without sacrificing satisfaction. Here’s what makes almond flour special:
Almond flour is protein-rich. One ounce of almond flour contains about 6 grams of protein—significantly more than wheat flour’s 4 grams per ounce. Since we’re using 2½ cups (10 ounces) of almond flour, you’re getting roughly 60 grams of protein in the entire pizza. That’s a complete protein source, especially when combined with cheese and any meat toppings.
The fat profile is exceptional. Almonds are rich in monounsaturated fats, the same heart-healthy fats found in olive oil and avocados. The fat in this crust slows digestion, which means you feel full longer and your blood sugar stays more stable. Compare this to traditional pizza, where simple carbs spike blood sugar quickly.
It’s naturally lower in carbs. One slice of this pizza (assuming 8 slices) contains roughly 6-8 grams of carbohydrates, compared to 30-40 grams in a slice of traditional pizza. This makes it genuinely suitable for low-carb, keto, or diabetes-friendly eating—not as a “keto substitute,” but as nutritionally complete food.
According to USDA data, a 100-gram serving of almond flour provides about 570 calories, 21 grams of protein, 50 grams of fat, and 20 grams of carbohydrates. This nutritional density means you need less volume to feel satisfied. Most people eat one or two slices of this pizza and feel genuinely full, which is different from traditional pizza where you might eat three slices and still feel hungry 30 minutes later.
Make-Ahead Guide: Smart Meal Prep Strategies
I’m all about making dinner less stressful, so here’s how to prep this pizza strategically:
The night before: Prepare all your toppings. Chop vegetables, pre-roast the watery ones, measure out your sauce, and shred cheese if needed. Store everything in separate airtight containers in the refrigerator. This means tomorrow night, you’re literally just mixing the dough and baking.
Partially prepared dough: You can prepare the dough through Step 3 (mixing) up to 4 hours ahead. Store it in the refrigerator in an airtight container. When you’re ready to bake, let it sit at room temperature for 15 minutes to take the chill off, then proceed with rolling and baking. The dough doesn’t improve with sitting (unlike yeast doughs), but it holds fine.
The full-batch approach: Make two pizzas at once. Bake the first one fully, enjoy it fresh, then freeze the second pizza fully baked. You now have homemade pizza available any night—just thaw and reheat. This is genuinely easier than ordering delivery by the time you factor in wait time.
Crust-only prep: Bake multiple crusts without toppings and freeze them. Then, any weeknight, you can top and finish-bake a frozen crust in about 10-12 minutes. It’s faster than any delivery option and infinitely more nutritious.
Seasonal Variations: Adapting the Recipe Year-Round
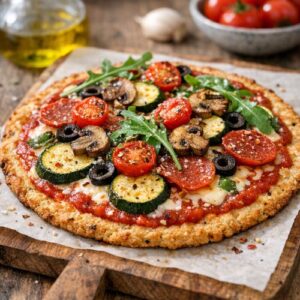
I love how this recipe adapts to seasonal ingredients. Here are my favorite variations:
Spring version: Add fresh herbs to the dry ingredients—2 teaspoons of fresh dill or tarragon, finely minced. Top with roasted asparagus, spring peas, fresh ricotta dollops, and a drizzle of honey after baking. The sweetness of honey balances the herbaceous crust beautifully.
Summer version: Add 1 tablespoon of fresh basil (finely minced) to the dry ingredients. Top with roasted zucchini, fresh mozzarella, cherry tomatoes (roasted first), and fresh basil leaves added after baking. The bright herbs celebrate the season perfectly.
Fall version: Stir 1 teaspoon of smoked paprika into the dry ingredients. Top with roasted butternut squash, crispy sage leaves, caramelized onions (roast for 20 minutes), and crumbled goat cheese. The sweetness of squash against the savory crust is incredible.
Winter version: Add ½ teaspoon of dried oregano to the dry ingredients. Top with caramelized onions, roasted Brussels sprout leaves, crispy pancetta or prosciutto, and sharp cheddar. The deep, rich flavors satisfy winter cravings completely.
Nutrition Information
Per slice (based on 8 slices, crust only, no toppings): Approximately 210 calories, 18 grams of fat, 7 grams of protein, 6 grams of carbohydrates, and 3 grams of fiber. This data aligns with USDA information for almond flour and eggs.
The protein-to-carb ratio here is exceptional—you’re getting more protein grams than carb grams, which is the opposite of traditional pizza. This matters for satiety. After eating one or two slices, your blood sugar stays stable, and you feel satisfied for hours instead of experiencing the energy crash that often follows traditional carb-heavy pizza.
When you add typical pizza toppings (cheese, sauce, pepperoni), you’re adding roughly 50-100 calories per slice and 6-8 grams of additional protein, keeping the overall nutritional profile impressive. A fully topped slice remains lower in carbs and higher in protein than traditional pizza.
What Can I Serve With Almond Flour Pizza Dough Recipe?
Pizza night doesn’t have to be one-dimensional. Here are my favorite pairings that round out the meal:
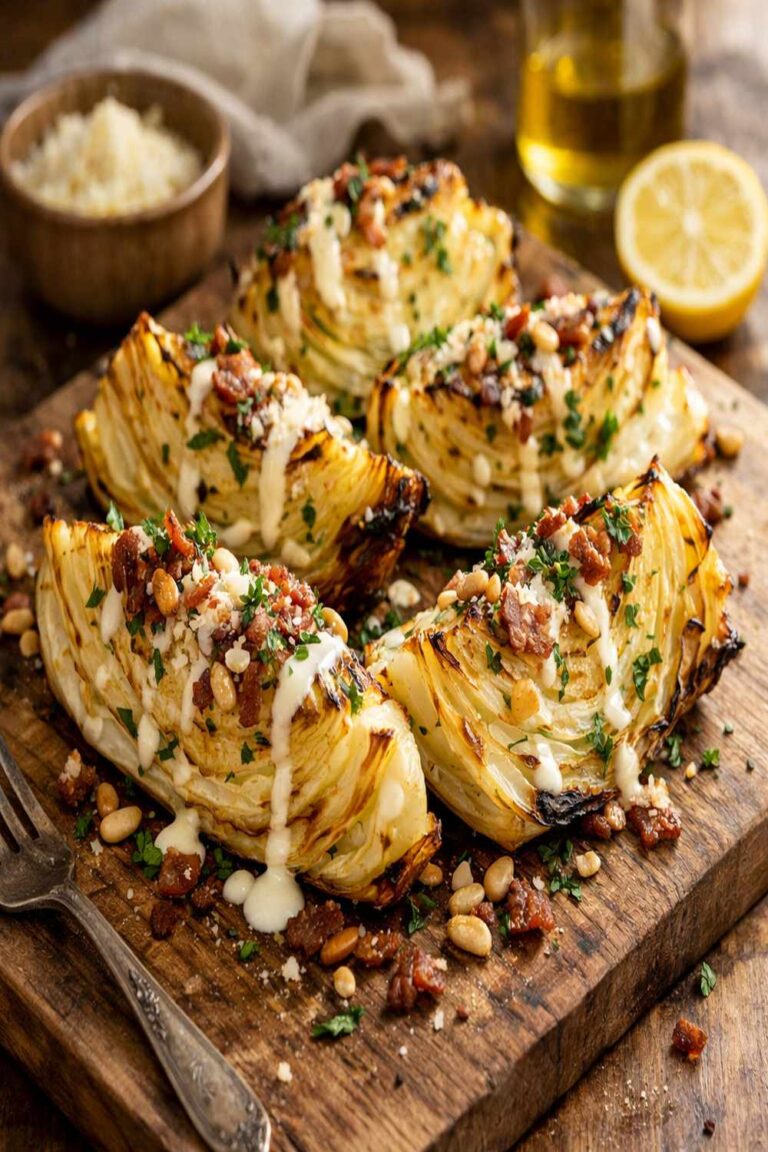
- Crispy roasted vegetables on the side – I love pairing this pizza with Baked Cabbage Recipe, which adds texture and volume without adding heavy carbs. The charred edges complement the almond flour crust beautifully.
- A simple green salad – Toss fresh greens with a lemon vinaigrette. The acidity cuts through the richness of the cheese and adds freshness to an otherwise indulgent meal.
- Roasted broccoli or cauliflower – Season with garlic and olive oil, roast at 425°F for 15 minutes. You can prep this while the pizza bakes, and everything comes together at the same time.
- Bone broth or light soup – A small cup of warm bone broth or vegetable soup alongside the pizza adds volume and minerals without competing for your appetite.
- For dessert, something light – Since this pizza is nutritionally complete and satisfying, serve a light finish. Baked Pear Recipe is perfect—naturally sweet, elegant, and won’t make you feel stuffed after a filling pizza dinner.
Almond Flour Pizza Dough Recipe
Ingredients
Method
- Start by preheating your oven to 400°F (200°C). While it heats, grab a large mixing bowl and combine your almond flour, baking soda, salt, garlic powder, onion powder, Italian seasoning, and optional yeast. Whisk these together for about 30 seconds to distribute the leavening agents and spices evenly. Uneven distribution means some spots of your crust will brown faster than others, and you might get small patches with concentrated garlic or salt flavor. We want consistency throughout.
- Make a well in the center of your dry mixture—think of it like a little crater. Crack your two large eggs into a small bowl and beat them with a fork until the whites and yolks are fully combined. Pour the beaten eggs into the well, then add your ¼ cup olive oil. Don't mix yet. Let the wet and dry ingredients sit for just 30 seconds. This gives the almond flour a moment to start absorbing the moisture, which will make mixing easier and help you avoid overmixing (which can make the texture tough).
- Using a sturdy spatula, begin folding the dry ingredients into the wet mixture. You're looking for a consistency similar to cookie dough—moist, slightly sticky, but definitely holding its shape. The almond flour should be fully incorporated with no dry streaks remaining. Once the spatula gets difficult to use (because the dough is getting thick), switch to your hands. Use your fingers to gently press and fold the dough together for about 20-30 seconds. You want a cohesive ball that feels slightly sticky but doesn't stick aggressively to your fingers. If it's too wet, add 1 tablespoon more almond flour. If it's crumbly, add ½ tablespoon olive oil.

- Tear off two pieces of parchment paper, each about 12 inches long. Place one piece on your work surface, then place your dough ball in the center. Top with the second piece of parchment, pressing gently so the parchment sticks to the dough slightly. Using your hands, gently press the dough into a flat disc about ¼-inch thick. You're not trying to get it perfectly thin yet—just creating a workable base. For a thin, crispy crust, use a rolling pin to flatten the dough to about ⅛-inch thickness in a 12-inch circle. For a thicker, chewier crust, leave it at about ¼-inch thickness in a 10-inch circle. Work slowly and gently. If the dough resists rolling, let it rest for 1 minute under the parchment. This relaxes the almond flour structure and makes rolling easier without tearing.

- Carefully peel away the top piece of parchment paper. Smooth the edges of your crust—they should be relatively even and attractive. Keep the bottom parchment paper on the dough. Slide the bottom parchment (with the dough still on it) directly onto your preheated baking sheet. This keeps the crust from sticking and prevents the bottom from browning too quickly. If your baking sheet is smaller than your dough circle, that's okay—a small amount can hang slightly off the edge. Just be careful when moving it into the oven.

- Place the baking sheet in the center rack of your oven. Bake for 10-12 minutes, depending on thickness. You're looking for a golden-brown color on top and edges that feel firm and crispy when you gently tap them. The thicker your crust, the longer this takes—a ¼-inch crust might need the full 12 minutes, while a very thin ⅛-inch crust might be done at 10 minutes. This prebaking step is absolutely critical. It sets the structure before toppings add moisture, creating a waterproof barrier that keeps your center from getting soggy.

- Remove the crust from the oven and let it cool for 1-2 minutes. Spread a thin layer of pizza sauce or unsweetened tomato passata across the crust—you want enough flavor but not so much that it pools (which adds moisture). About 3-4 tablespoons is perfect for a 12-inch crust. Remember: if you're using watery vegetables like mushrooms, zucchini, or fresh tomatoes, pre-roast them first for 8 minutes at 400°F to remove excess moisture. Dry toppings like pepperoni, cheese, and hardy vegetables can go on directly. Distribute cheese evenly—it protects the crust from direct heat and seals in the structure.
- Return the pizza to the center rack of your oven and bake for 5-8 minutes, until the cheese is melted and bubbly. Watch carefully—the edges can brown quickly, so don't step away. If you want the cheese more browned or bubbly, you can briefly broil on the top rack for 2-3 minutes, but this will significantly darken the crust edges. To prevent this, loosely tent the edges with small pieces of foil while broiling. The total time from putting the topped pizza in the oven should be around 5-8 minutes for cheese melting plus any broil time.

- Remove the pizza from the oven and let it rest for 2-3 minutes on the baking sheet before slicing. This cooling time allows the cheese to set slightly and makes slicing cleaner. Use a sharp pizza wheel or chef's knife to cut into 8 slices. Serve immediately while the crust is still crispy and warm. The parchment paper should peel away easily at this point. If it sticks slightly, just gently lift from one corner and peel back slowly.

Notes
FAQs
Can I use natural almond flour instead of blanched almond flour?
Technically yes, but I don’t recommend it for optimal texture. Natural almond flour includes the almond skin, which creates visible brown specks and a slightly grainier, sandier texture. The crust will still work and will taste great, but the texture won’t be as smooth as with blanched almond flour. If you only have natural almond flour on hand, process it in a food processor for 30 seconds to break down the larger particles before using. This helps but won’t completely solve the texture difference.
Why doesn’t my dough hold together? It keeps falling apart.
The most common cause is eggs that are too cold. Almond flour relies on eggs as the binder, and cold eggs don’t bind as effectively. Always use room-temperature eggs—if they’re cold, place them in warm water for 5 minutes before cracking. The second most common cause is skipping the prebaking step. Without prebaking, the structure never fully sets, so the crust is fragile. Make sure you’re baking for the full 10-12 minutes before adding toppings. Finally, verify your almond flour isn’t expired or stored improperly. Old almond flour (past 6-8 months) can become rancid and won’t bind well. Store it in the freezer if you buy in bulk.
Can I make this dough ahead and refrigerate it?
Yes, but only for 4 hours maximum. Store the mixed dough in an airtight container in the refrigerator. When you’re ready to bake, let it sit at room temperature for 15 minutes before rolling. The dough doesn’t improve with sitting (unlike traditional pizza dough with yeast). If you refrigerate it longer than 4 hours, the texture becomes slightly grainy. This is because almond flour’s oils can separate slightly with prolonged cold storage. For longer storage, bake the pizza fully, then freeze the cooked crust.
Is this suitable for people with tree nut allergies?
No. Almonds are tree nuts, so this recipe is absolutely not safe for anyone with tree nut allergies. There’s no substitute for almond flour that creates the same texture and binding properties. If you need a nut-free pizza option, look for recipes using cauliflower flour or a combination of coconut flour and tapioca starch, though the texture will be different.
Why is my pizza dough spreading and getting thin during the final bake?
This usually means either the crust wasn’t prebaked long enough, or the oven temperature is too high. First, verify your oven temperature with an oven thermometer—sometimes ovens run hot. If it’s accurate at 400°F, then your crust might not have been prebaked to full firmness. Aim for 12 minutes of prebaking if you like thicker crust, and verify the top is golden brown. The crust should feel completely firm when you gently press it before adding toppings. If it still feels slightly soft, give it 1-2 more minutes. Also, avoid adding too much sauce—excess moisture softens the structure. Stick to 3-4 tablespoons maximum.
Can I use this dough for breadsticks or flatbread?
Absolutely! This dough works beautifully for other applications. For breadsticks, roll the dough into a rectangle about ⅛-inch thick, brush with olive oil and garlic, cut into 1-inch strips, and bake at 400°F for 12-15 minutes until crispy. For flatbread, follow the pizza recipe exactly but skip the toppings—just bake the plain crust. Serve warm with dips like guacamole, hummus, or whipped ricotta. The texture is similar to cauliflower rice crackers but more substantial.
More Recipes You’ll Love