As the summer sun shines bright and gatherings become plentiful, navigating desserts can be a delightful puzzle. You want something that wows but is also easy to share. Cue magic bars. If you’re wondering what pairs perfectly with these sweet treats, consider a scoop of vanilla ice cream, a dollop of whipped cream, or even a fresh fruit salad. Each option offsets the rich flavors of the bars while bringing its unique flair to the table.

Let’s Dive In: What are Magic Bars?
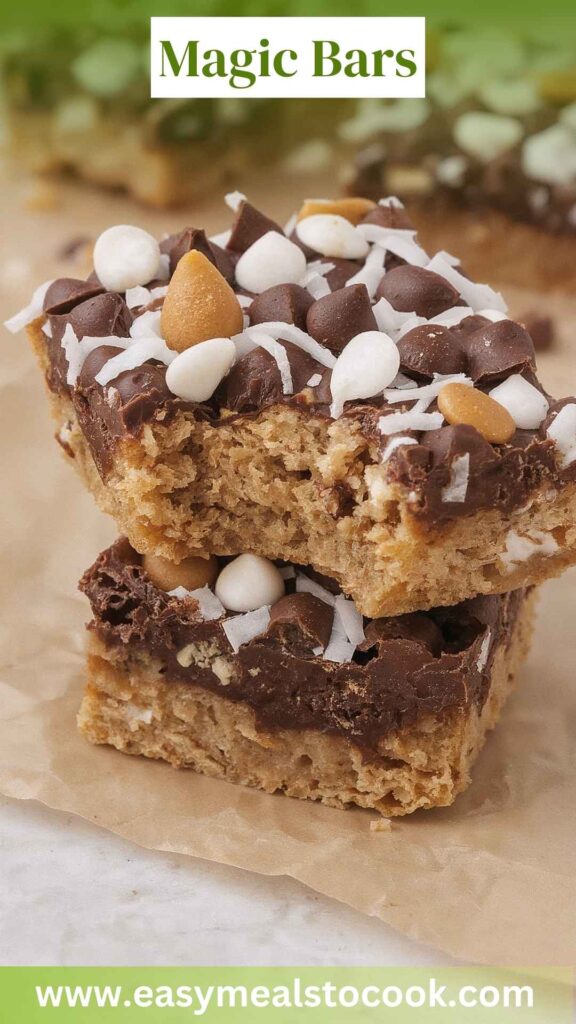
Magic bars, often called Hello Dolly bars, are an indulgent dessert that layers various sweet ingredients over a buttery crust. Imagine a symphony of textures, from a crumbly foundation to gooey fillings. Each bite is like a treasure hunt, revealing the sweet surprises of chocolate chips, coconut, and nuts. These bars are not only easy to make—they also transport you to a happy place with every sweet morsel.
What is the Flavor Profile of Magic Bars?
The flavor profile of magic bars is simply delightful. You’ll find a rich, buttery base that offers a satisfying crunch. Then comes the sweetness from butterscotch chips and chocolate, enhanced by the tropical hints of shredded coconut. The optional nuts add a lovely crunch, creating a complex texture that’s hard to resist. When it’s all combined, it’s an exciting mix of flavors: sweet, buttery, and slightly nutty.
Why You’ll Love These Bars
You’ll love magic bars for their simplicity and versatility. You can whip them up in no time, making them a go-to option for last-minute gatherings. Plus, they’re adaptable! Don’t have all the ingredients? You can swap in whatever you have on hand. They’re a perfect treat for families, potlucks, and parties.
Ingredients for Magic Bars
To get started, here’s what you’ll need:
- 1 cup (125g) all-purpose flour, spooned and leveled
- 1 cup (about 120g) finely crushed graham cracker crumbs (around 8–9 full sheets)
- 1/2 teaspoon baking powder, aluminum-free preferred
- 1/4 teaspoon fine sea salt
- 1/4 teaspoon ground cinnamon (optional, for a warm note)
- 1/2 cup (8 Tbsp; 113g) unsalted butter, softened at room temperature
- 3/4 cup (150g) lightly packed golden brown sugar
- 1 teaspoon pure vanilla extract (or vanilla bean paste for richer flavor)
- 1 large egg, preferably at room temperature
- 1 cup (175g) creamy butterscotch chips
- 1/3 cup (40g) chopped toasted pecans or walnuts (optional, for crunch)

Step-by-Step Instructions
Step 1: Preheat the Oven
Start your journey by preheating your oven to 350°F (175°C). This ensures a perfect bake right from the get-go.
Step 2: Prepare the Baking Dish
Take an 8×8-inch (or 9×9-inch) baking dish. Line it with parchment paper, allowing some overhang on the sides. This will make it easy to lift out the bars later. And trust me, you want them to come out smoothly.
Step 3: Make the Base Layer
In a mixing bowl, combine the all-purpose flour, graham cracker crumbs, baking powder, sea salt, and cinnamon (if using). Mix everything well. Then, in another bowl, blend the softened butter and brown sugar together until creamy. Add the vanilla extract and egg, mixing until well combined. Now, gradually stir in the flour mixture until you have a thick, consistent batter.
Step 4: Press the Mixture into the Dish
Spoon the batter into your prepared baking dish. Press it down evenly with your fingers or the back of a spatula. Aim for an even thickness across the base.
Step 5: Add the Toppings
Next, sprinkle the butterscotch chips evenly over the crust. If you’re adding nuts or chocolate chips, now’s the time to do so. Finally, top it off with shredded coconut. Don’t be shy—add as much as you like!
Step 6: Bake to Perfection
Place the dish in your preheated oven and bake for about 25-30 minutes. Keep an eye on it; once the edges are golden brown, you’re good to go. The center might still look a little soft, but it will firm up as it cools.
Step 7: Allow to Cool
Once baked, remove the dish from the oven and let it cool completely on a wire rack. Don’t rush this part! Cooling helps the bars set properly and makes cutting much easier.
Step 8: Slice and Serve
After your magic bars have cooled, use the parchment paper to lift them out of the dish. Slice into squares or rectangles, and serve these delightful treats at your next gathering.
Tips & Tricks
- Use Room Temperature Ingredients: This helps the butter blend seamlessly, resulting in a creamier batter.
- Chill the Bars: For an easy, clean cut, refrigerate the bars for about an hour before slicing.
- Experiment with Mix-ins: Feel free to swap in chocolate chips, dried fruit, or different nuts based on your preferences. Be creative!
- Store in an Airtight Container: These bars can last up to a week at room temperature, making them a perfect prepare-in-advance treat.
- Add a Pinch of Sea Salt: A sprinkle of sea salt on top of the bars before baking enhances the sweet flavors beautifully.
Nutrition Information
Magic bars, while delicious, are indulgent. Here’s a rough breakdown of the nutrition per serving (assuming 16 servings from the recipe):
- Calories: Approx. 200
- Total Fat: 10g
- Saturated Fat: 5g
- Carbohydrates: 30g
- Sugar: 12g
- Protein: 2g
These values can vary depending on specific brands and ingredients used. Treat yourself but be mindful of portions!
How Can You Store Magic Bars?
To store your magic bars:
- Let Them Cool Completely: This prevents condensation from forming and making them soggy.
- Wrap or Transfer: You can store them in an airtight container or wrap them in plastic wrap.
- Refrigeration: For longer shelf life, pop them in the fridge. They can last up to two weeks if stored properly.
Ingredient Alternatives
If you’re running low on certain ingredients, don’t worry! Here are some alternatives to consider:
- Unsalted Butter: Use coconut oil, melted, for a dairy-free version while maintaining a rich flavor.
- Graham Cracker Crumbs: If you don’t have these, oatmeal cookies or digestive biscuits can create a similar flavor profile.
- Butterscotch Chips: Chocolate chips, whether milk, dark, or white, can easily replace butterscotch chips for a different twist.

Conclusion
Magic bars are a delightful choice for any occasion. They bring together a fantastic mix of flavors and textures that stand out on any dessert table. From the step-by-step instructions to the fun tips, you’re equipped to create a delicious batch. Plus, there’s something enchanting about a treat that feels like a little slice of happiness in every bite. So go ahead! Gather your ingredients and whip up these magical goodies. You won’t regret it.
You’ll also like the following Recipes!

Magic Bars – Easy Meals To Cook
Description
As the summer sun shines bright and gatherings become plentiful, navigating desserts can be a delightful puzzle. You want something that wows but is also easy to share. Cue magic bars. If you’re wondering what pairs perfectly with these sweet treats, consider a scoop of vanilla ice cream, a dollop of whipped cream, or even a fresh fruit salad. Each option offsets the rich flavors of the bars while bringing its unique flair to the table.
Ingredients
Instructions
Step 1: Preheat the Oven
-
Start your journey by preheating your oven to 350°F (175°C). This ensures a perfect bake right from the get-go.
Step 2: Prepare the Baking Dish
-
Take an 8x8-inch (or 9x9-inch) baking dish. Line it with parchment paper, allowing some overhang on the sides. This will make it easy to lift out the bars later. And trust me, you want them to come out smoothly.
Step 3: Make the Base Layer
-
In a mixing bowl, combine the all-purpose flour, graham cracker crumbs, baking powder, sea salt, and cinnamon (if using). Mix everything well. Then, in another bowl, blend the softened butter and brown sugar together until creamy. Add the vanilla extract and egg, mixing until well combined. Now, gradually stir in the flour mixture until you have a thick, consistent batter.
Step 4: Press the Mixture into the Dish
-
Spoon the batter into your prepared baking dish. Press it down evenly with your fingers or the back of a spatula. Aim for an even thickness across the base.
Step 5: Add the Toppings
-
Next, sprinkle the butterscotch chips evenly over the crust. If you’re adding nuts or chocolate chips, now’s the time to do so. Finally, top it off with shredded coconut. Don't be shy—add as much as you like!
Step 6: Bake to Perfection
-
Place the dish in your preheated oven and bake for about 25-30 minutes. Keep an eye on it; once the edges are golden brown, you’re good to go. The center might still look a little soft, but it will firm up as it cools.
Step 7: Allow to Cool
-
Once baked, remove the dish from the oven and let it cool completely on a wire rack. Don't rush this part! Cooling helps the bars set properly and makes cutting much easier.
Step 8: Slice and Serve
-
After your magic bars have cooled, use the parchment paper to lift them out of the dish. Slice into squares or rectangles, and serve these delightful treats at your next gathering.
Nutrition Facts
Servings 16
- Amount Per Serving
- Calories 200kcal
- % Daily Value *
- Total Fat 10g16%
- Saturated Fat 5g25%
- Total Carbohydrate 30g10%
- Sugars 12g
- Protein 2g4%
* Percent Daily Values are based on a 2,000 calorie diet. Your daily value may be higher or lower depending on your calorie needs.
Note
- Use Room Temperature Ingredients: This helps the butter blend seamlessly, resulting in a creamier batter.
- Chill the Bars: For an easy, clean cut, refrigerate the bars for about an hour before slicing.
- Experiment with Mix-ins: Feel free to swap in chocolate chips, dried fruit, or different nuts based on your preferences. Be creative!
- Store in an Airtight Container: These bars can last up to a week at room temperature, making them a perfect prepare-in-advance treat.
- Add a Pinch of Sea Salt: A sprinkle of sea salt on top of the bars before baking enhances the sweet flavors beautifully.