Before diving into the art of caramelizing onions, let’s take a moment to explore what makes this dish so versatile. Caramelized onions complement various dishes beautifully. You can add them to burgers, pizzas, and pasta. They serve as an elegant topping for steak or roasted vegetables. You can even mix them into soups or dips to elevate the flavor profile.
Now, imagine a juicy cheeseburger topped with velvety, sweet caramelized onions. It’s mouthwatering, right? Or consider a gourmet pizza topped with mushrooms, mozzarella, and these delectable onions. With these ideas in mind, let’s peel back the layers on how to achieve truly exceptional caramelized onions.

What Are Caramelized Onions?
At their core, caramelized onions are simply onions cooked slowly over low heat until they become golden brown and sweet. This process requires patience and attention but rewards you with layers of flavor. You’ll find different techniques across cultures, but the method to achieve them remains the same.
The Flavor Profile of Caramelized Onions
Caramelized onions are sweet, savory, and slightly nutty. Imagine the enticing smell that wafts through the air as they cook. There’s nothing quite like it! The sweetness enhances any dish, while the savory notes complement other flavors, making your meal more rounded.
What Makes This Recipe Different From Other Caramelized Onion Recipes?
Many recipes for caramelized onions might skimp on detail or skip essential steps. I’ve spent years perfecting this method, ensuring it brings out the best flavors.
This version includes optional ingredients that elevate the taste without overcomplicating the process. A touch of aged balsamic vinegar and fresh thyme can add depth.
Ingredients You’ll Need
You don’t need much to create this culinary delight. Here’s your shopping list:
- Several medium to large onions (Yellow, white, or red varieties work well)
- 1 tablespoon unsalted butter (optional for richness)
- A drizzle of extra virgin olive oil (to help caramelize evenly)
- A dash of cracked black pepper (for subtle warmth)
- A pinch of kosher salt (to enhance sweetness)
- 1/2 teaspoon light brown sugar (optional for balance)
- 1 teaspoon aged balsamic vinegar (optional for tang)
- 1/4 teaspoon fresh thyme leaves (optional for herbal notes)

Step by Step Directions
Step 1: Prepare Your Onions
Start by peeling your onions. This is the least exciting part, but it’s crucial. Once peeled, slice the onions. Aim for thin slices to allow for even cooking. The thinner the slice, the faster they’ll caramelize.
Step 2: Heat the Pan
Grab a large skillet and place it over medium-low heat. You want a non-stick skillet for an easy cooking experience. Add a drizzle of olive oil, and then, if using, toss in your butter. Allow it to melt, coating the pan.
Step 3: Add the Onions
Once the oil is hot, carefully add the sliced onions. They should sizzle a little but not burn. Stir them to coat with oil. This is where the magic begins.
Step 4: Season the Onions
Sprinkle the pinch of kosher salt over the onions. This draws out moisture, which helps with the caramelization process. If you’re including brown sugar, thyme, or vinegar, now’s the time to add them in. Mix them well.
Step 5: The Waiting Game
Lower the heat to medium-low and toss the onions every few minutes. The goal is to let them cook slowly. You want them to gradually turn golden brown. This process typically takes about 30 to 40 minutes, but don’t rush it.
Step 6: Stir for Great Results
Check on your onions every 5-10 minutes. If they are sticking to the pan, you can add a tablespoon of water or broth to deglaze. Keep stirring, and when they get to a rich golden color, they’re ready.
Step 7: Taste and Adjust
Before serving, taste the onions. If you’d like more sweetness, adjust with a bit more brown sugar or vinegar.
Tips on Making Caramelized Onions
- Go Low and Slow: The key to perfect caramelized onions is patience. Don’t rush the process.
- Use Quality Ingredients: A good quality olive oil makes a significant difference.
- Stir Regularly: While it’s essential to let the onions do their magic, stirring ensures they don’t stick or burn.
- Experiment with Flavors: Don’t hesitate to add a splash of balsamic or a sprinkle of herbs like thyme or rosemary to elevate flavors.
- Scale Up: Feel free to make a big batch. These keep well in the fridge and can boost multiple meals throughout the week.
Nutrition Information
Caramelizing onions might feel like an indulgent treat, but they can be healthy, too. Here’s a rough breakdown:
- Calories: Varies based on oil and butter used, but roughly around 70-100 calories per serving.
- Carbohydrates: Approximately 15 grams.
- Fiber: About 2 grams per serving.
- Sugars: Naturally occurring sugars are elevated due to caramelization.
Note: Nutritional values can change based on substitutions.
How Can I Store This Recipe?
Caramelized onions can be stored in an airtight container in the refrigerator for up to a week. If you want to keep them longer, consider freezing them. Portion them into freezer-safe bags and label them. They can last for about three months in the freezer.
Substitute Options for Ingredients
Sometimes, you might find yourself short on an ingredient or two. Here are some substitutes to consider:
1. Yellow Onions
- Substitute with red onions for a bolder flavor, or sweet onions like Vidalia for a milder taste.
2. Unsalted Butter
- Use coconut oil or an extra drizzle of olive oil for a vegan option. Both will still give a rich mouthfeel.
3. Brown Sugar
- If you don’t have brown sugar, honey or maple syrup can enhance sweetness effectively.
4. Aged Balsamic Vinegar
- Regular balsamic or a splash of apple cider vinegar can add acidity and depth if you lack aged options.

Conclusion
Caramelized onions are more than just a cooking technique; they’re a way to enhance the flavors of your dishes. By following this simple guide, you can create a delicious topping that elevates everything from a simple breakfast omelet to a sophisticated risotto. The key lies in patience and attention to detail, and missing out on those homemade, sweet onions would be unwise.
Now it’s time to grab your apron, head to the kitchen, and indulge in the sweet experience of creating caramelized onions. Your dishes—and taste buds—will thank you!
You’ll also like the following recipes!
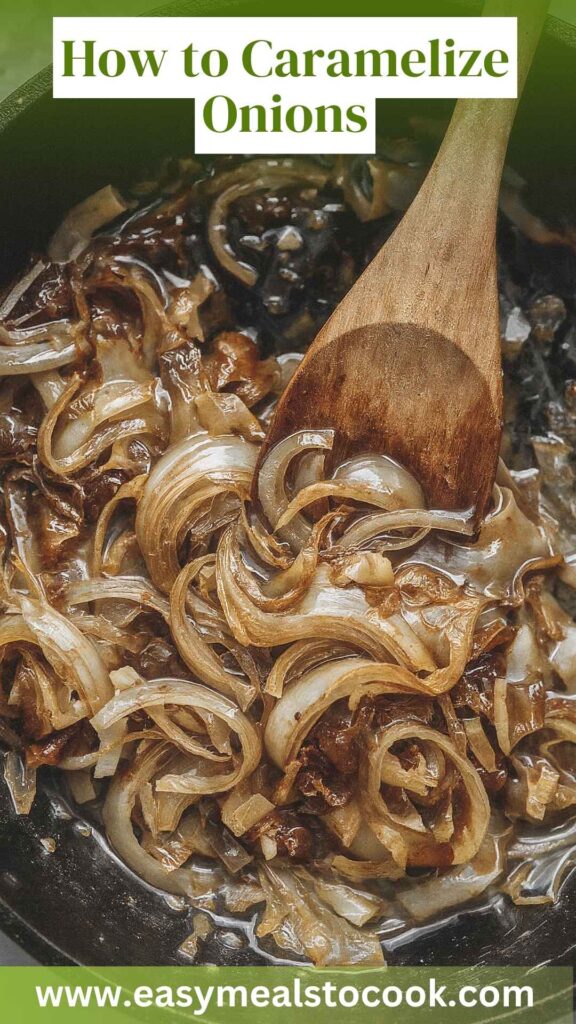

How to Caramelize Onions – Easy Meals To Cook
Description
Caramelized onions are more than just a simple side ingredient. They are a transformative element in cooking, turning everyday meals into culinary masterpieces. When cooked low and slow, onions undergo a magical transformation. The heat brings out their natural sugars, resulting in a rich, deep flavor unlike any other. This cooking technique is cherished across cuisines, and for a good reason.
Whether you are an experienced cook or just starting, mastering the caramelization process will undoubtedly up your kitchen game. So, let’s dive into what caramelized onions are, their flavor profile, and what makes this recipe a must-try.
Ingredients
Instructions
Step 1: Prepare Your Onions
-
Start by peeling your onions. This is the least exciting part, but it’s crucial. Once peeled, slice the onions. Aim for thin slices to allow for even cooking. The thinner the slice, the faster they’ll caramelize.
Step 2: Heat the Pan
-
Grab a large skillet and place it over medium-low heat. You want a non-stick skillet for an easy cooking experience. Add a drizzle of olive oil, and then, if using, toss in your butter. Allow it to melt, coating the pan.
Step 3: Add the Onions
-
Once the oil is hot, carefully add the sliced onions. They should sizzle a little but not burn. Stir them to coat with oil. This is where the magic begins.
Step 4: Season the Onions
-
Sprinkle the pinch of kosher salt over the onions. This draws out moisture, which helps with the caramelization process. If you’re including brown sugar, thyme, or vinegar, now’s the time to add them in. Mix them well.
Step 5: The Waiting Game
-
Lower the heat to medium-low and toss the onions every few minutes. The goal is to let them cook slowly. You want them to gradually turn golden brown. This process typically takes about 30 to 40 minutes, but don’t rush it.
Step 6: Stir for Great Results
-
Check on your onions every 5-10 minutes. If they are sticking to the pan, you can add a tablespoon of water or broth to deglaze. Keep stirring, and when they get to a rich golden color, they’re ready.
Step 7: Taste and Adjust
-
Before serving, taste the onions. If you’d like more sweetness, adjust with a bit more brown sugar or vinegar.
Nutrition Facts
Servings 8
- Amount Per Serving
- Calories 100kcal
- % Daily Value *
- Total Carbohydrate 15g5%
- Dietary Fiber 2g8%
* Percent Daily Values are based on a 2,000 calorie diet. Your daily value may be higher or lower depending on your calorie needs.
Note
- Go Low and Slow: The key to perfect caramelized onions is patience. Don’t rush the process.
- Use Quality Ingredients: A good quality olive oil makes a significant difference.
- Stir Regularly: While it’s essential to let the onions do their magic, stirring ensures they don’t stick or burn.
- Experiment with Flavors: Don’t hesitate to add a splash of balsamic or a sprinkle of herbs like thyme or rosemary to elevate flavors.
- Scale Up: Feel free to make a big batch. These keep well in the fridge and can boost multiple meals throughout the week.